


iPhone Setup
Conveniently located to serve the areas of Undefined
Set Up IMAP – iPhone™, iPad™, iPod®
Steps are compatible with 3G and 4.0.
To set up IMAP, do the following:
1. Tap Settings, Mail, Contacts, Calendars, Add Account, Tap Other and then Add Mail Account.

2. Enter the following information in the spaces provided:
• Name—Enter your first and last name. This is the name that will appear in the From field of messages you send.
• Address—Enter your entire email address (e.g., myname@mydomain.com).
• Password—Enter the password for your email account.
• Description—Enter a descriptive name for the account (e.g., Work Account). This description will be visible only to you.
• Tap the Save button.
Note: If IMAP is not already selected, tap the IMAP button.
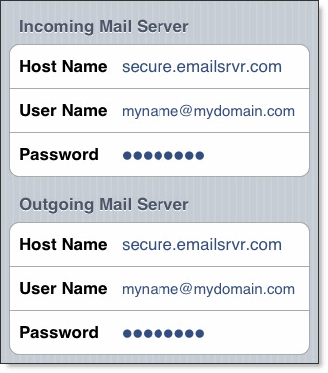
4. Under both the Incoming Mail Server and Outgoing Mail Server sections, enter the following information:
• Host Name—Enter the secure server name:
• secure.emailsrvr.com
• User Name—Enter your entire email address (e.g., myname@mydomain.com).
• Password—Enter the password for your email account.
• Server addresses.
5. Tap the Save button and the device will verify settings and return to the Mail, Contacts, Calendars screen.
Configure Default Folders
• Tap Settings, Mail, Contacts, Calendars, Select your account, scroll down and Tap Advanced
• Under Mailbox Behaviors, tap Drafts Mailbox.
• Under On the Server, tap Drafts.
• Tap Advanced and Tap the Sent Mailbox.
• Under On the Server, tap Sent.
• Tap Advanced and thenTap Deleted Mailbox.
• Under On the Server, tap Trash.